
Email domain are one of the most effective marketing tools. Your email domain not only shows your professionalism but also has the ability to attract many potential customers to your website.
Many companies today have used email domains as a tool to increase reliability, ensure professionalism, and establish standard working processes. So, what is an email domain? How to create a professional Email domain for free?
In the following article, I will explain to you and guide you how to create one or more email domains for free.
1. What is an email domain?
The email domain is an important part of the email address, appearing after the “@” symbol. Email addresses usually include three main components: username, “@” symbol, and root domain.
For example, if I want to create an email domain for the Admin Team of Helloimsky Company (whose website address is helloimsky.com), the formula will be as follows:
- Username: admin
- Default @ symbol
- Root domain: helloimsky.com
So the email domain of the customer service department will be: admin@helloimsky.com
These components provide the server with information about the owner of the email, the destination email address, and the type of connection being used. The domain name part of the address is usually the name of the company, internet service provider or service from a third party, such as Hotmail or Gmail.
2. How many types of email domains are there?
There are many ways to classify email domains, but to keep it simple and easy to understand, we temporarily divide it into two main classifications:
2.1. Email hosting
This type of mail domain is provided by the hosting service and comes with the service package. Email hosting is suitable for businesses with few email accounts and infrequent use.
Some server providers can sell separate email hosting packages depending on your needs. You can buy separate email hosting (the server is only used to store emails) or use shared hosting with your website (on the server containing the website, you can set aside a separate space to store emails).
Because this is an almost free service that comes with hosting (a server), this type of email will use servers and IP addresses with many other users. This can limit resources and bandwidth for each subscriber.
Besides, using hosting from server providers can hardly avoid security problems. Although server providers are always committed to data privacy, who knows, one day they may be able to read your email (although this possibility is very low, it is not possible)?
In addition to cost advantages, email hosting also has another advantage, which is that it is very easy to configure and use. I will guide you how to configure and use email hosting in the following section.
2.2 Email server
This type of email is configured specifically for the business’s domain name and optimized for sending and receiving email. Separate email servers and separate IP addresses are not shared with other customers. This allows for a more professional email creation and management process.
If you have good financial conditions, along with knowledge of server administration, you can build your own email server at home or at your company. This ensures the complete privacy of your email system.
The downside of this email server is that it has quite a high cost. In addition, you must have good knowledge of server administration to be able to create, use, and maintain this server system (not to mention issues of system security and data management).
3. How to create a professional Email domain for free?
Except for the ways for people with money (buying email domain services from major providers like Google or Microsoft), the scope of this article will guide you how to create a very professional email domain, but completely free.
The mandatory condition to have an email domain is, of course, to have a domain name. And you must be the owner of that domain name, with full authority to manipulate the domain configuration.
3.1. Create an email domain with web hosting
3.1.1. Instructions for creating an email domain
As the title suggests, this method uses the hosting (server) that hosts the website to store emails. I tried this method on the server of the famous hosting provider AZDigi .
AZDigi Hosting has many discount codes and extremely low costs. You can see details of their cheap hosting packages for newbies here.
Go to Home / Customer page / Product Management / Services / Service details, then select Email Account.

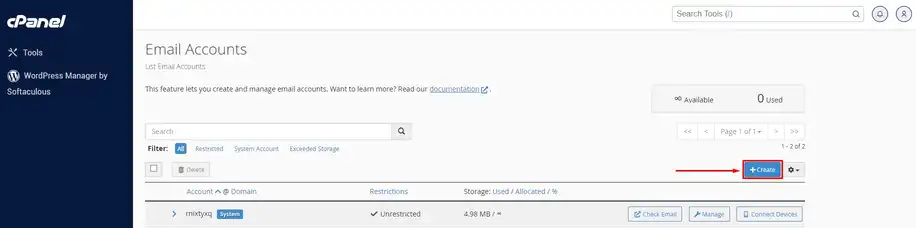
At the admin interface, select the “Create” button to create a new email for yourself.
In the Username section, enter the username you want to create. Here, you can give it any name you want, but to be more professional, you should name it according to the department.
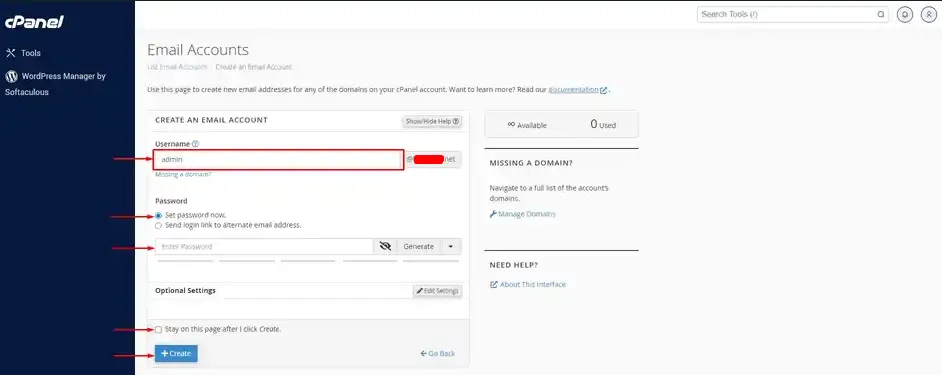
For example, if I want to create an email domain for the management department (named admin) of helloimsky.com, I set the username to admin. If it’s a support team, I’ll name it support, and if it’s a business team, I’ll call it sales.
Then, select Set password now to set a password for your email. Passwords should contain uppercase letters, lowercase letters, numbers, and special characters to increase security.
You do not need to select the line Stay on this page after I click Create, so after finishing, the system will transfer you to the next configuration page to continue working. Then press the Create button to start creating your email.
After clicking Create, the system will complete creating an email domain for you and return you to the administration page. Select the Manage section of the email you just created to continue the configuration.
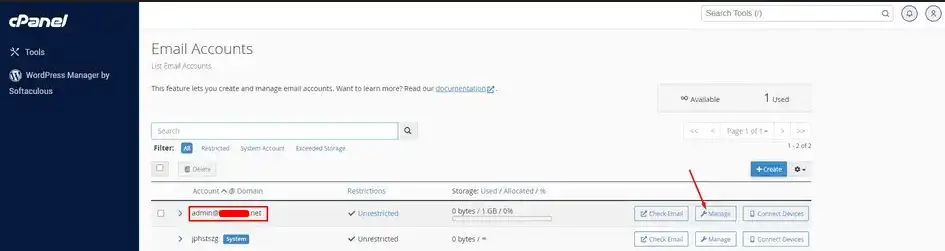
First, in the Allocated Storage Space section, you choose the capacity for your email. Because this email domain is used together with web hosting, you must divide the capacity appropriately to avoid affecting the capacity of the website.
If your hosting is large, you can always choose Unlimited for comfort. Personally, I find the default (1GB) to be very comfortable for those who use email as a personal means.

Next, select Check Email to check email and get parameters, then set up and use the email domain with another email browser. The reason you have to do this step is because:
- Email hosting’s interface is quite difficult to use and not user-friendly.
- Email hosting’s interface can only be used on a web browser, not on a phone app, which is quite inconvenient.
- For security reasons, every time you close your web browser or computer, email hosting will automatically log out. The next time you want to log in, you have to log in again.
- You will check Email to get the necessary parameters, then set these parameters with a 3rd party mail browser (could be Google’s Gmail, Microsoft’s Outlook, or another party).
- After installing a third-party mail browser, you can use that party’s app or utilities to browse mail for convenience.
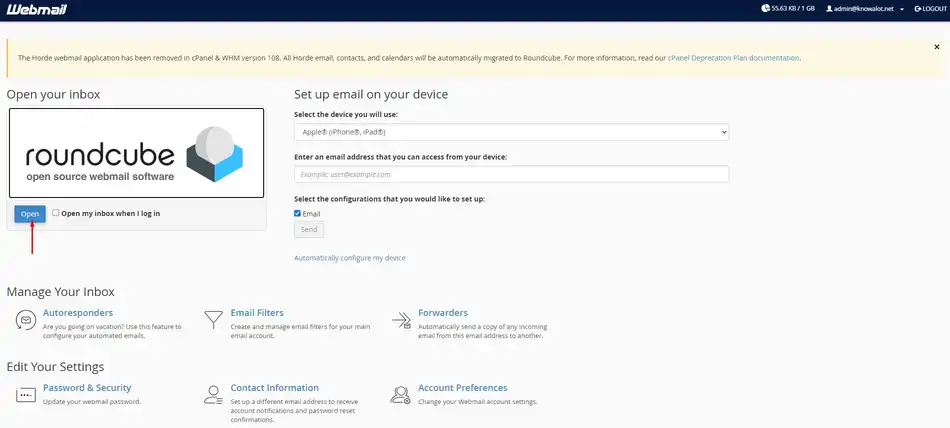
Click Open to open the email box of the email domain you just created on Email Hosting.

As you can see, email hosting’s interface is not really very friendly. Please select the email the system sent you to get the parameters.
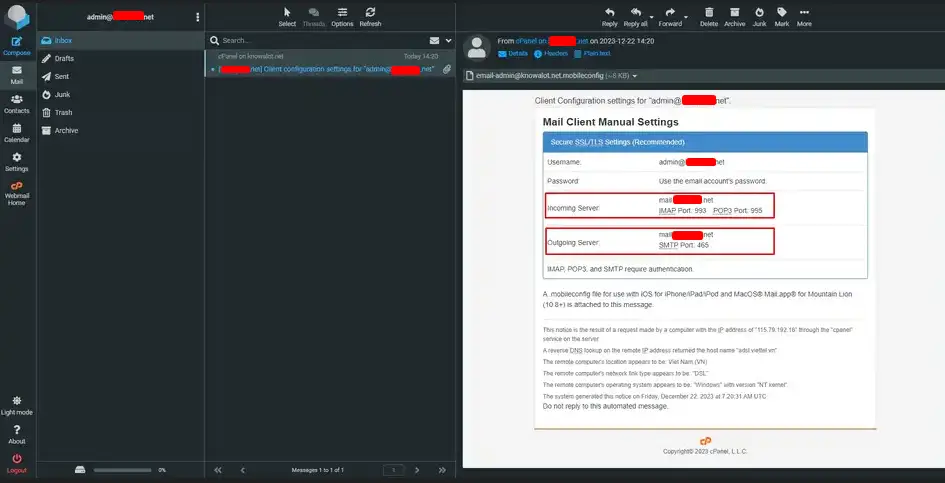
These are the parameters that you need to pay attention to, especially Incoming Server and Outgoing Server. These two parameters are very important in setting up your email domain on a third-party mail browser.
3.1.2. Instructions for installing and using email domain with Microsoft Outlook
I chose Outlook to use for my email domain, because Outlook is quite popular, available on both computers and apps on phones, easy to install and very easy to use.
3.1.2.1. Installation instructions with Microsoft Outlook 2019
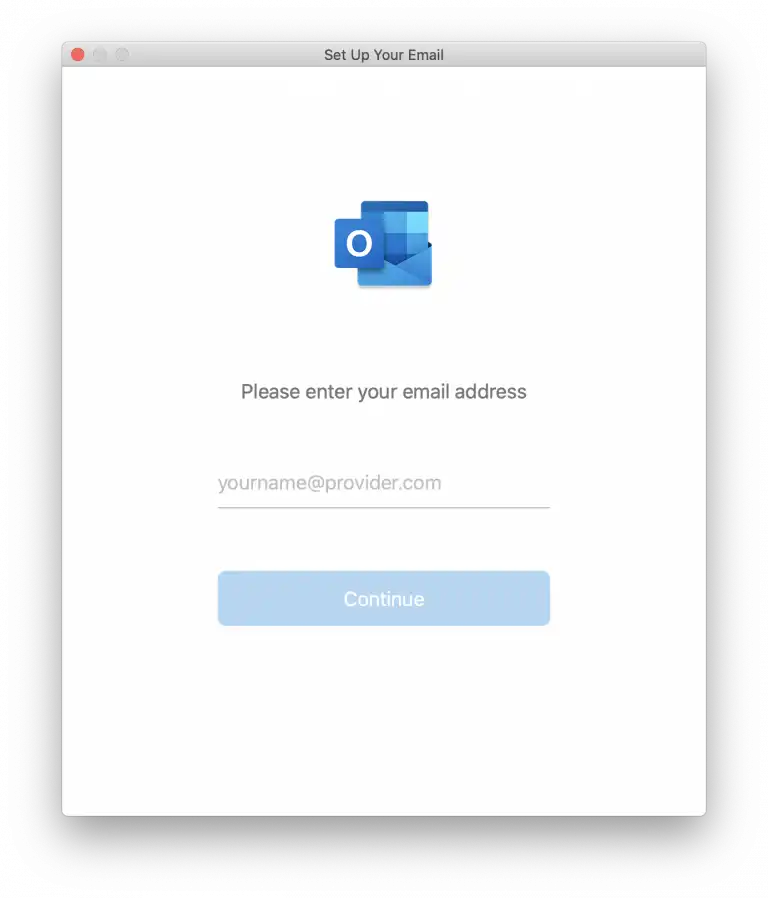
In this section, we will show you how to set up mail for Outlook (2019 version). First, open Outlook. When the Outlook Mail window opens, fill in the Email domain and click the Continue button.
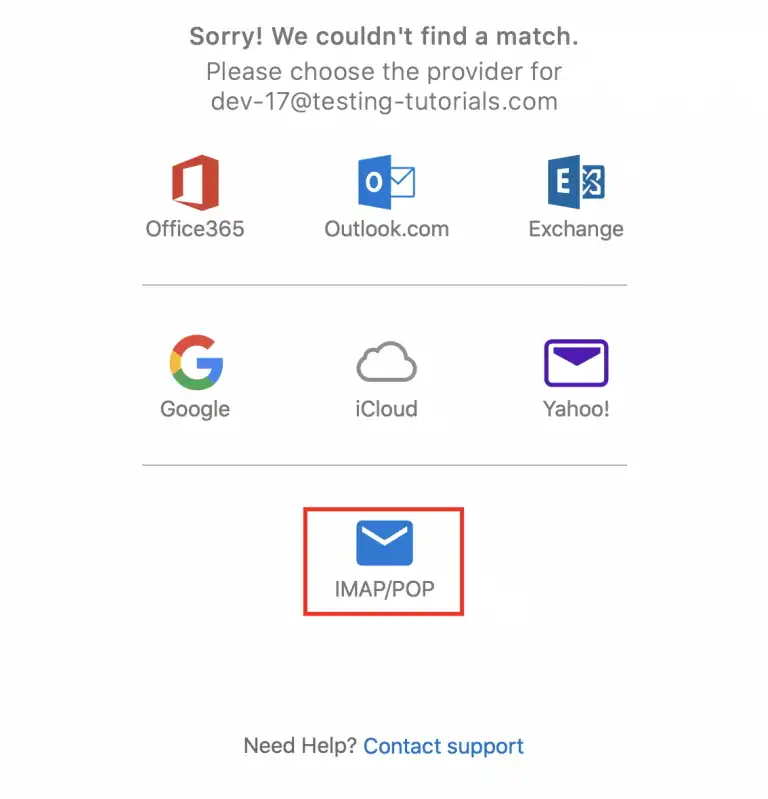
Then, select IMAP/POP, when you see the mail provider selection screen.
Next, you can choose POP or IMAP, just fill in the corresponding information. This is the information about the Incoming Server and Outgoing Server that you saved before. If you don’t remember, please open it again.
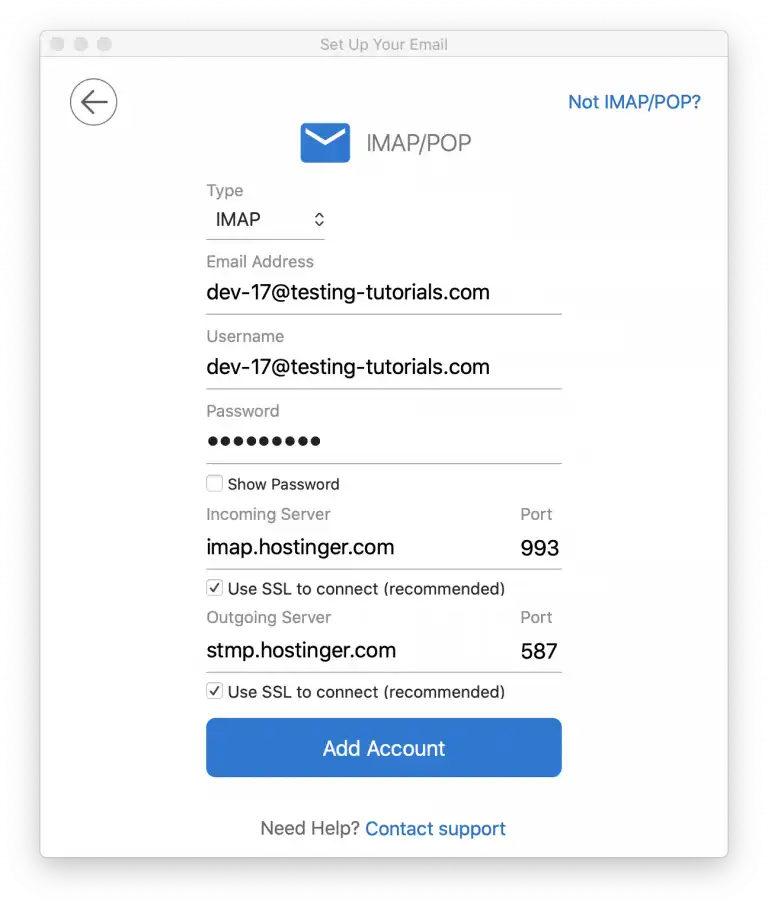
Note that if you choose POP, you must enter information according to POP, and if you choose IMAP, you must enter information according to IMAP accurately. Then press the Add Account button to proceed. Enter the password, press the Connect button, and wait for the process to complete. If successful you will see a screen like below.
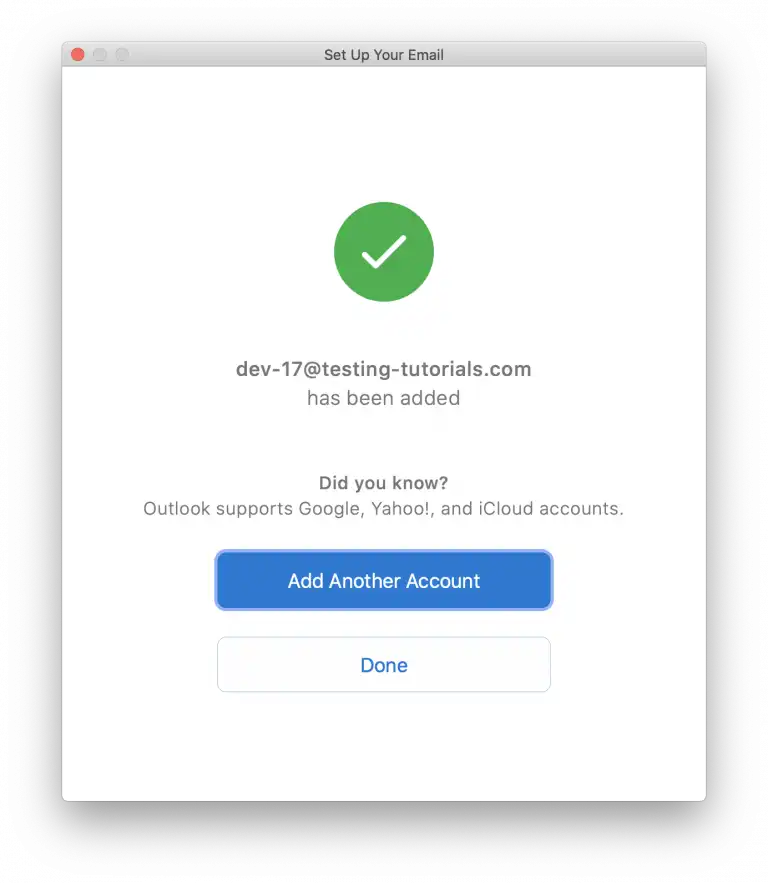
That’s it, now you just need to press the OK button and it will start Outlook immediately.
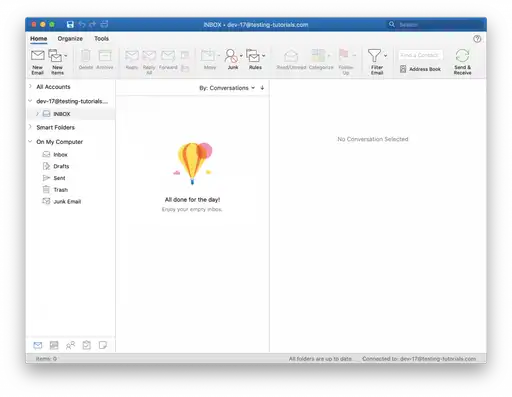
3.1.2.2. Installation instructions with Microsoft Outlook 2016
In this section, you will learn how to set up email on Outlook (2016 version). If you open this Outlook Mail Client for the first time, the setup screen will appear for you to enter your email, select Let me setup my account manually and then press the Connect button.
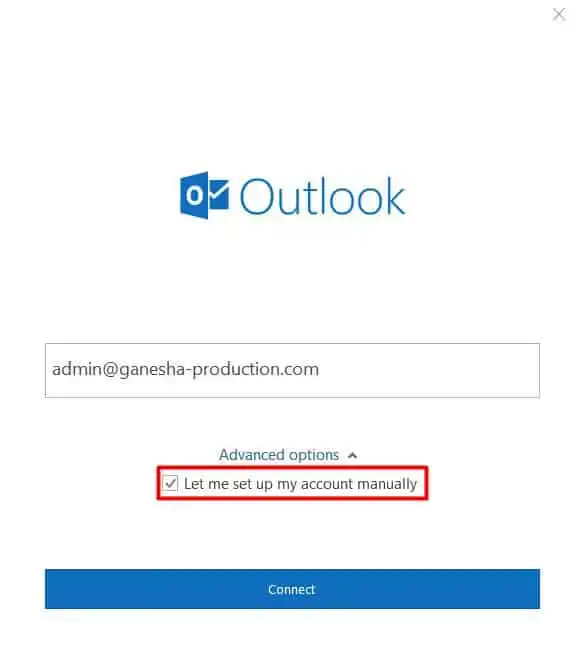
The next screen will appear, where you can choose between POP and IMAP. Fill in the information you got from the preparation step and click the Next button to proceed. Then enter the password and press the Connect button.

If an error screen appears, you need to adjust the configuration by clicking the Change Account Settings button to check if the information is correct.
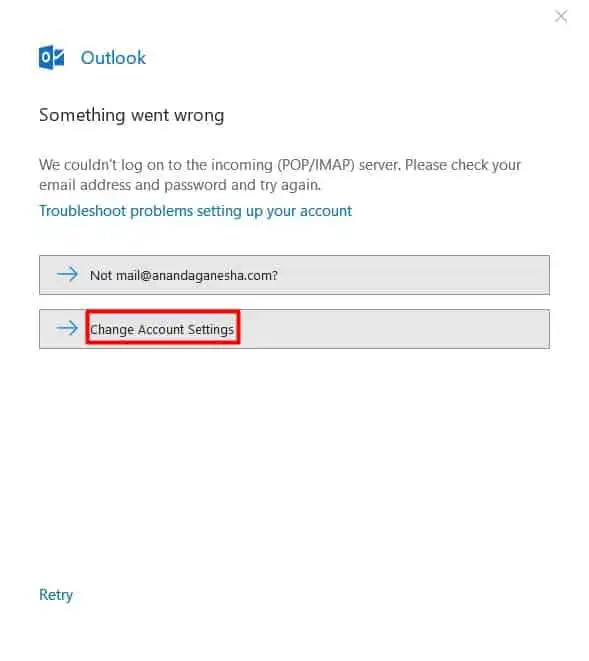
If successful, the result screen will be as follows:
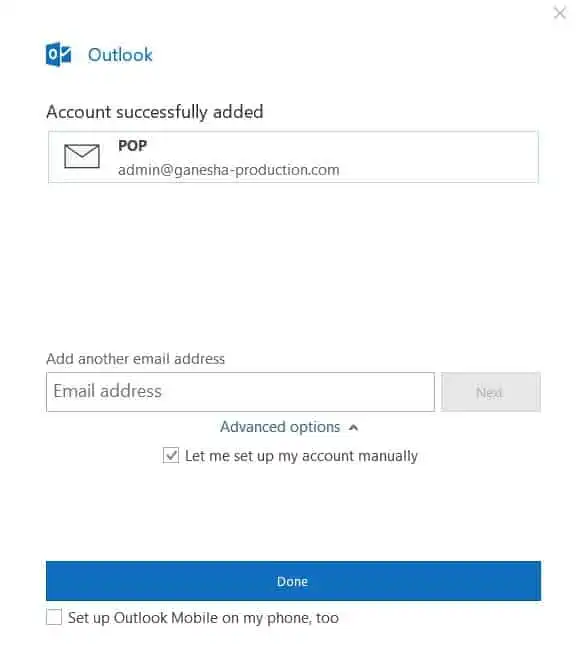
Depending on your choice, it is POP or IMAP. Next, click the Done button to go to the Outlook Mail interface of Microsoft Outlook 2016.

3.1.2.3. Installation instructions with Microsoft Outlook 2013
In this example, we are using Outlook 2013. If this is not the first time you are opening the outlook mail client, you can add a new account by clicking the File button in the upper left corner of the screen.

Then click Add Account to add a new email account.
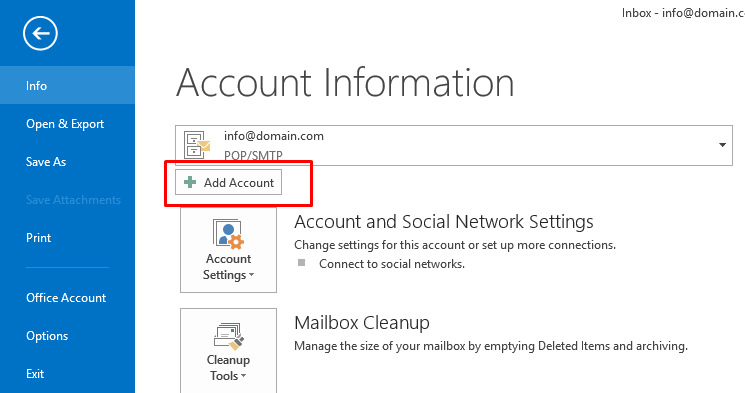
If you open Outlook for the first time, you may see a Welcome message. Click Next.

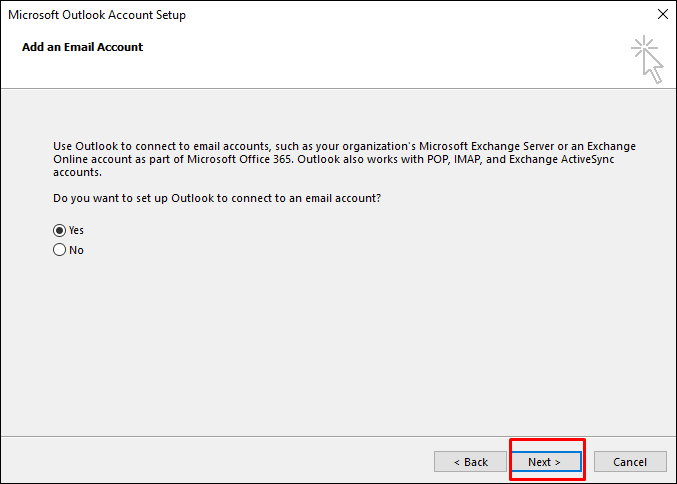
You will see the Do you want to set up Outlook to connect to an email account?. Select Yes and click Next.
In the next page, you will see 2 options. In this tutorial, we choose Manual setup or additional server types.
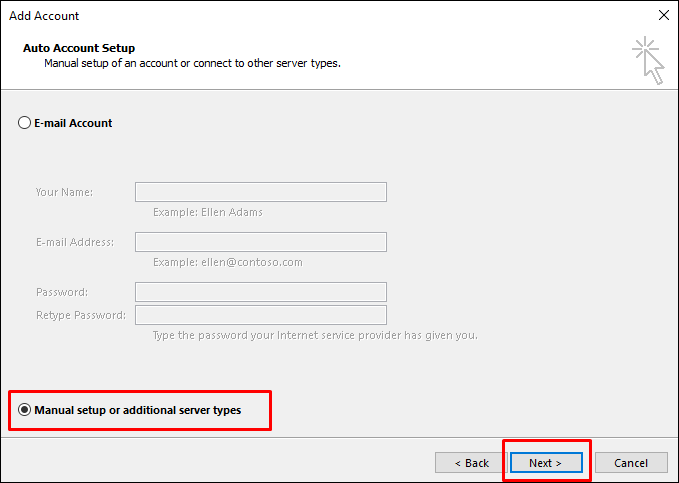
After clicking Next, you will see a screen like below to select POP or IMAP and click Next.

In this step, you need to fill in the Incoming Server and Outgoing Server details that you saved above.
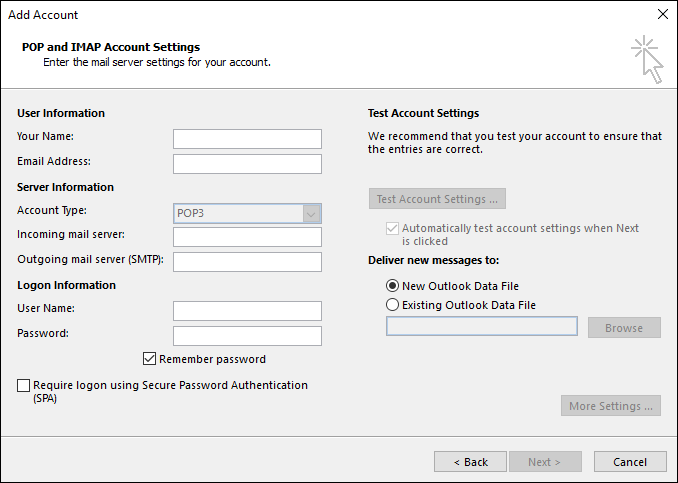
Please fill in the following information:
- Your Name – Name displayed when sending email, you can enter your name
- Email Address – Enter the email address that needs to be set up
- Account Type – This option is up to you. Most mail service providers support POP3 and IMAP and each has its advantages. You just need to note that if you choose POP, you must enter information according to POP, and if you choose IMAP, you must enter information according to IMAP accurately.
After you’ve entered all the information, don’t click Next yet, instead click More Settings.

Select Outgoing Server in the new window that appears. Here you need to check My outgoing server (SMTP) requires authentication. This is necessary if your email/hosting provider requires SMTP authentication.
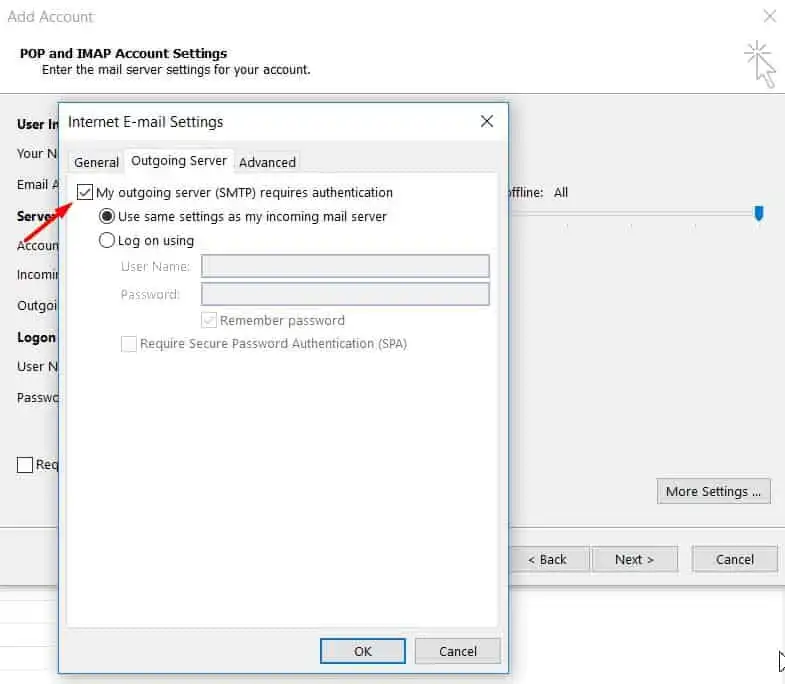
Then select Advanced to enter the port numbers and encrypted connection as shown below, and then click OK.
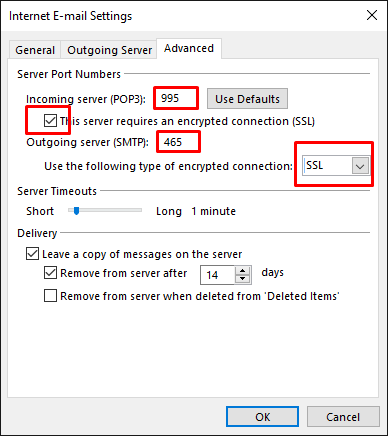
You will be redirected to the previous page. Select Next. Outlook Mail will automatically test email delivery with a sample email. If successful you will see:
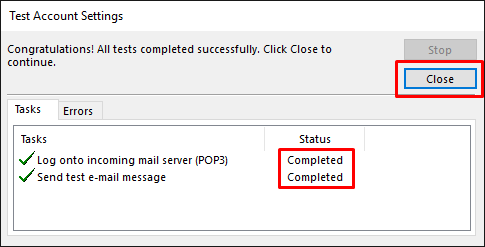
If you see an error message, please check all configuration information and make sure you have filled in the correct parameters that the provider gave you, and you can contact the provider for further instructions. Click Close if the test is successful.
After success, on Outlook you will see the following window:
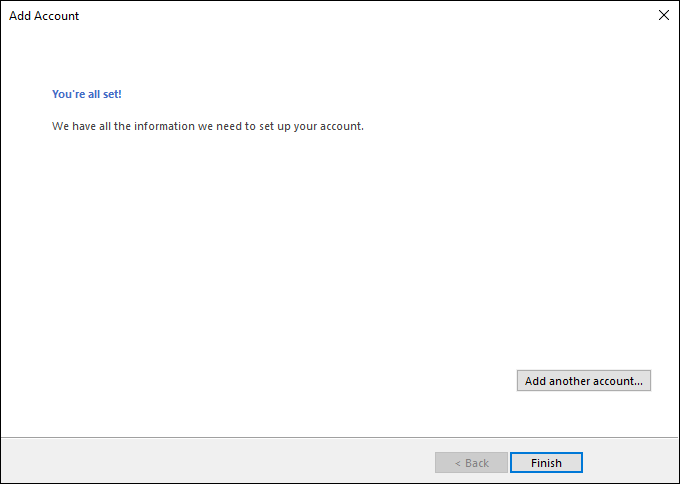
Select Finish and use email on Outlook Mail.
3.1.2.4. Note
Some notes when setting up email domain with Microsoft Outlook are as follows:
- Always save and enter Incoming Server and Outgoing Server accurately during operations.
- Basically, configuring and installing email domains with Microsoft Outlook on computers and phones is similar. On the phone, it’s a lot simpler.
- The password used to operate is the password of the email domain, not the password to log in to the hosting.
3.2. Create free email domains with Zoho Mail
Zoho Mail is a business domain-based email service that operates on a cloud computing platform. When using Zoho Mail, user data will be synchronized with features in the same system, such as Zoho Docs or Zoho Storage. The way this service works and the features are considered to be quite similar to Gmail, Yahoo, and Outlook.
Zoho Mail is developed by Zoho Corporation from India. This service is currently available in more than 150 countries and territories globally, such as the US, UK, Korea, Japan, etc. According to an announcement from this company, by 2020, the number of users of this service will have reached 50 million around the world.
The advantage of Zoho Mail is that you will get 5 GB of free storage. In addition, the Zoho Mail app is also simple, with a friendly and easy-to-use interface. You just need to successfully create a domain email via Zoho’s portal, and you can use it to log in to Zoho Mail on your browser or Zoho App. Mail on your phone without the need for complicated configuration like Microsoft Outlook.
Now I will show you how to create a domain email for free with Zoho Mail.
3.2.1. Step 1 – Sign up for a Zoho Mail account
First, go to Zoho Mail’s homepage at www.zoho.com/en/mail, then go to the pricing section. Or you can click directly here. Then scroll down and select TRIAL NOW in the FREE FOREVER PACKAGE section.
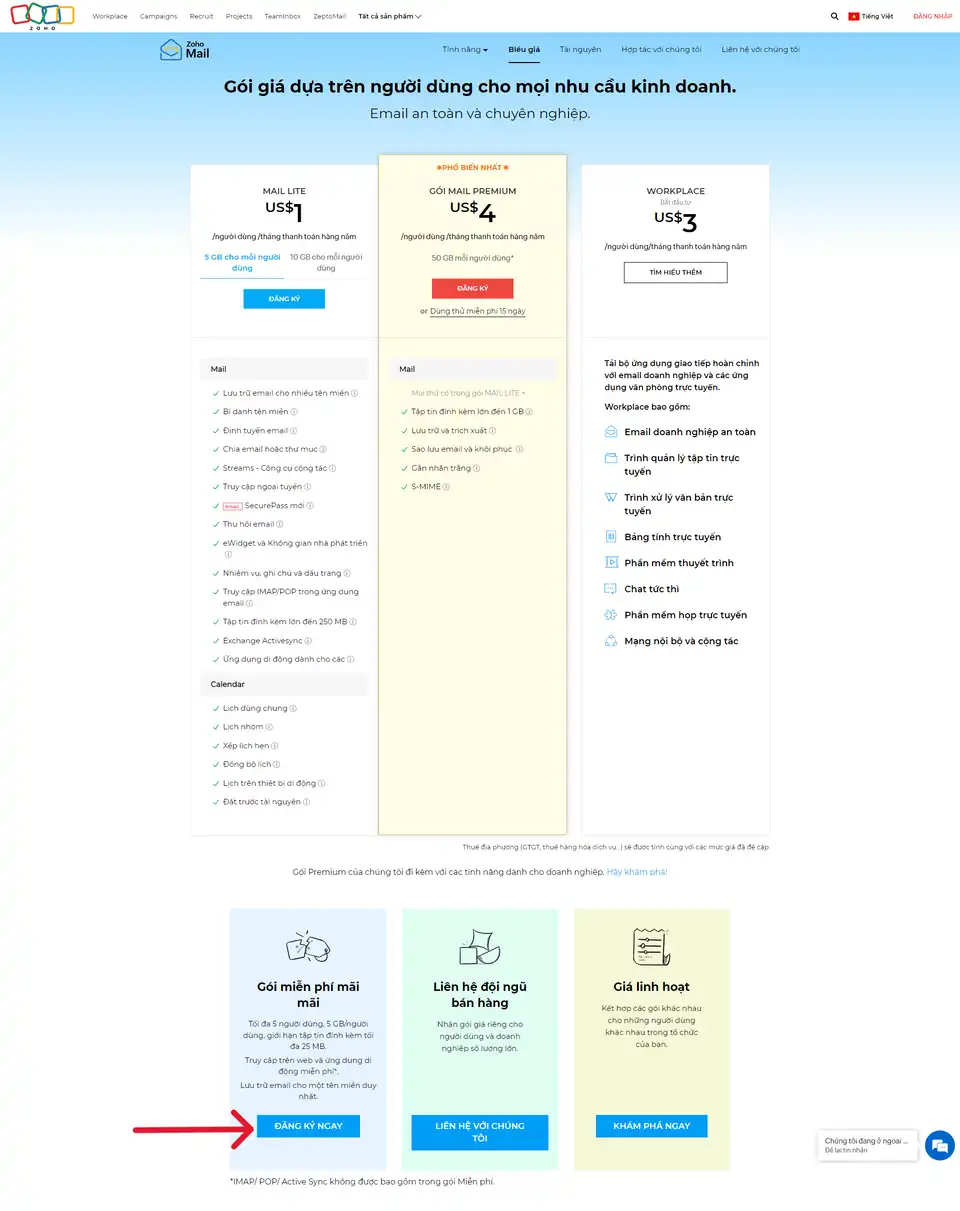
The registration panel will appear, and you will fill in all required information, including full name, email address (this is your personal email address, you can use Gmail for convenience), phone number, and password. password and click Sign Up to move on to the next step.

At this time, a verification code will be sent to the email address or phone number you just entered. Copy and fill in the verification box, select Verify to complete registration.
3.2.2. Step 2 – Install and validate domain name
Zoho Mail will give you 2 options. If you already have a domain name, select Add now and enter the domain address. If you don’t have one, select Buy now to buy a domain name from Zoho Mail. In this case, Knowalot.net will only guide you if you already own a domain name.
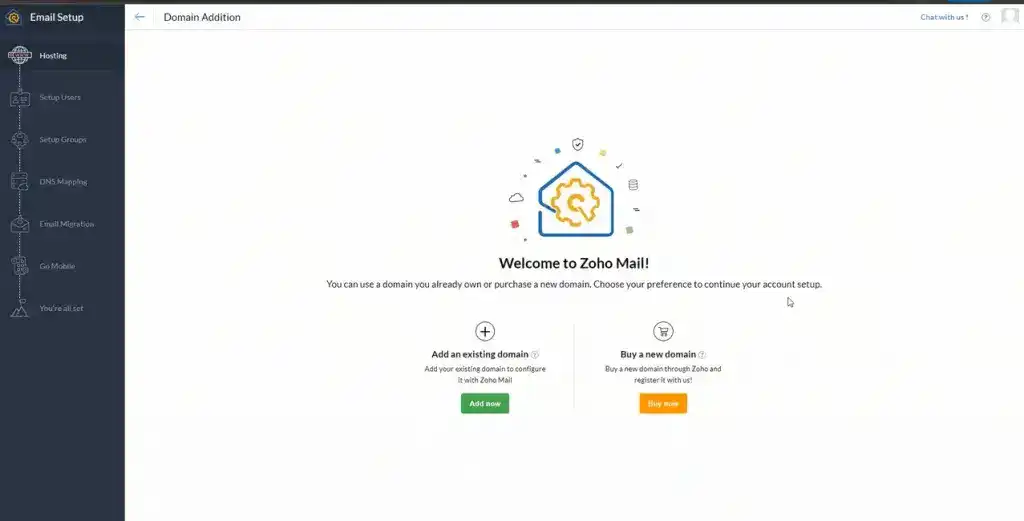
After clicking Add now, an information table will appear, here you can fill in:
- Provide your existing domain name: the domain name belongs to you.
- Provide your organization name: your organization name or project name
- Industry Type: your industry name. If not, you can choose Other.

After entering the domain name and business name, click Add now, Zoho will take you to the administration page of your accounts. Here you can change your avatar, add an account, add contact information,…
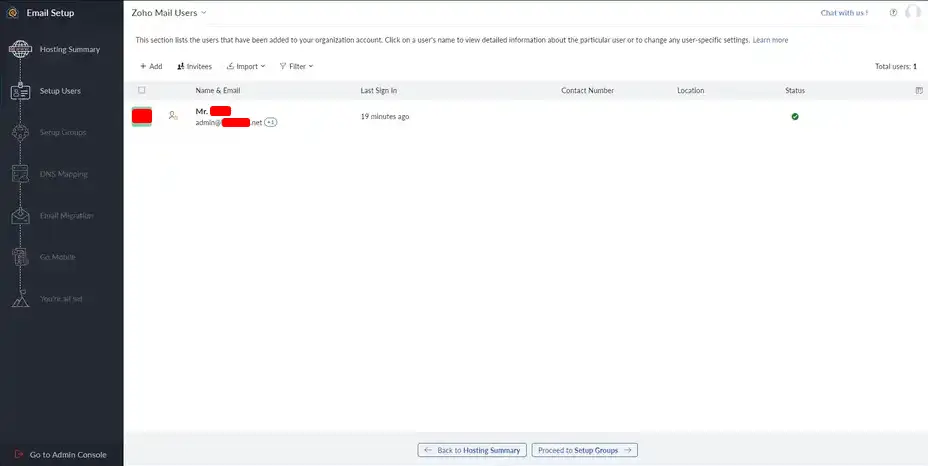
The next step is to authenticate the domain name. This is quite an important step, please pay attention to this carefully. You select Back to Hosting Summary to start verifying the domain name.
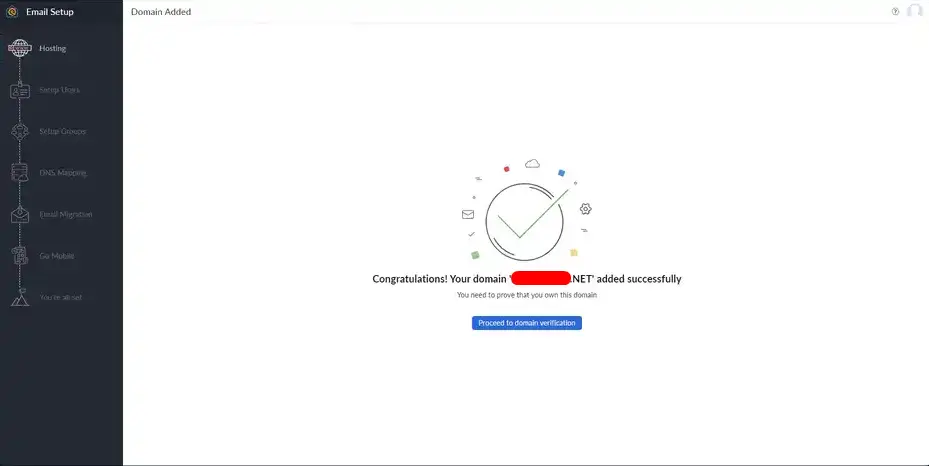
In particular, Zoho Mail will provide you with 3 authentication methods:
- Add a TXT record to DNS.
- Add a CNAME record to DNS.
- Upload the HTML file to the website.
Here, you choose to authenticate by adding the TXT record to DNS as suggested by Zoho mail. Then, you log in to the domain configuration manager and create a new record with the following information:
- TXT name: You set it as @ or leave it blank.
- TXT Value: Copy information from Zoho mail.

If you go to the domain configuration manager and create new records, they will look like this:

Note that you must have an additional Record with Type as A Record, Host as mail and Value as your hosting IP (as shown in the picture) to be able to send and receive mail. Many of you forget to configure this. By the time you’re done, Zoho will notify you that authentication is complete, but when sending mail, the other end cannot receive it, and the Email domain itself cannot receive mail from you. others.
You wait a period of 30 minutes – 1 day for the new configuration to be updated. Then click Verify TXT Record to proceed with authentication. After being successfully authenticated, Zoho will transfer you to the Email domain account creation section.
3.2.3. Step 3 – Create a user account
After successful authentication, Zoho Mail will ask you to create a user email account for management. Fill in Username and select Create to create. Similar to how to create an email domain with web hosting above.
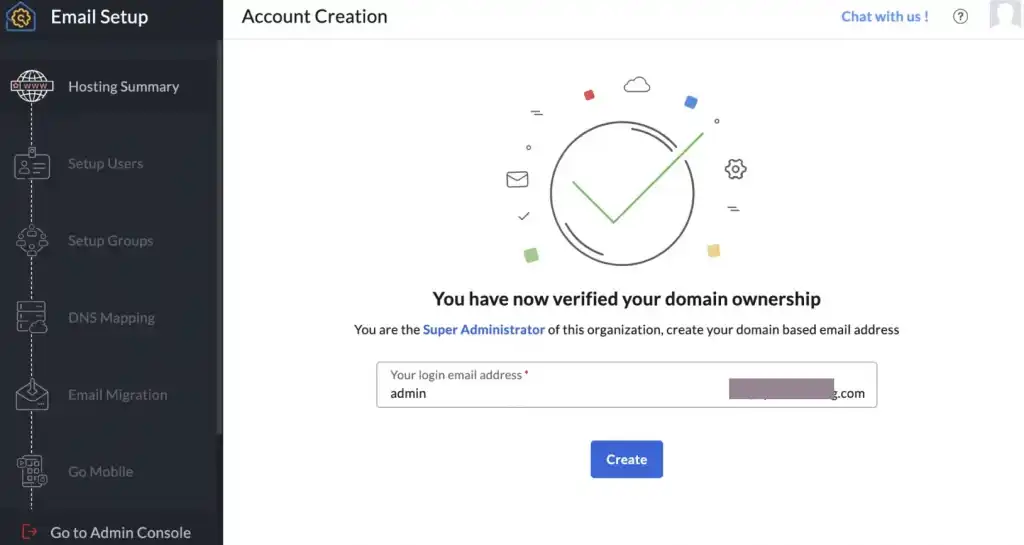
After creating a user account, you can choose to create a group to manage. Click Proceed to DNS Mapping and proceed with setup according to Zoho Mail’s instructions. If not, you can skip to the next step.

3.2.4. Step 4 – Configure MX, SPF and DKIM for email by domain name
MX, SPF and DKIM are 3 configurations that need to be set up to help your email send and receive mail into the user’s inbox. After creating a user account, Zoho Mail will take you to the step of setting up these 3 configurations.
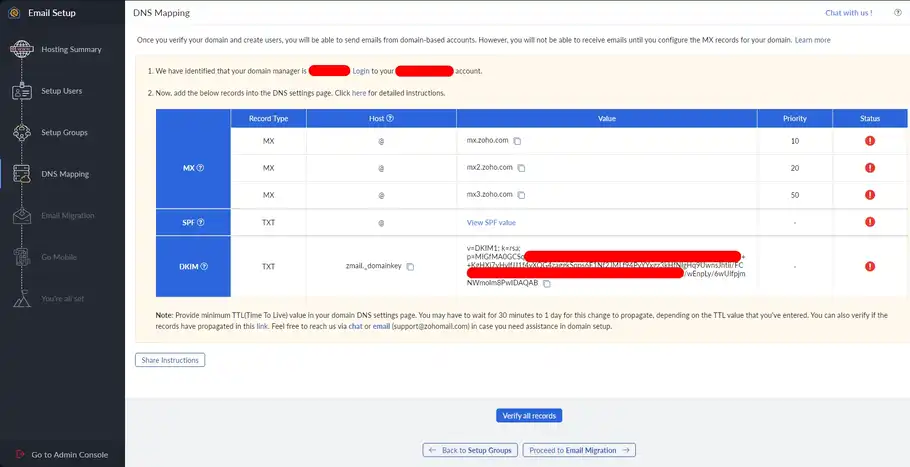
On the far right, on the Status column, there is a red exclamation mark, showing that you have not authenticated. When completed, they will turn into green sticks, so you have succeeded.
3.2.4.1. Configure MX Record
First, log in to the domain configuration manager and delete all the old MX records created previously. Then, add 3 new MX records with the following information and save the configuration.
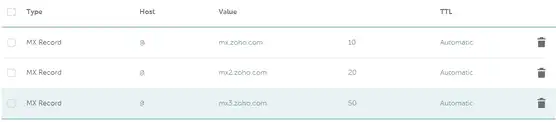
You need to wait a while for the new configuration to be updated to the system.
3.2.4.2. SPF configuration
The steps are similar to configuring MX Record but there are changes in information. Click on View SPF value in the SPF row to get SPF information.
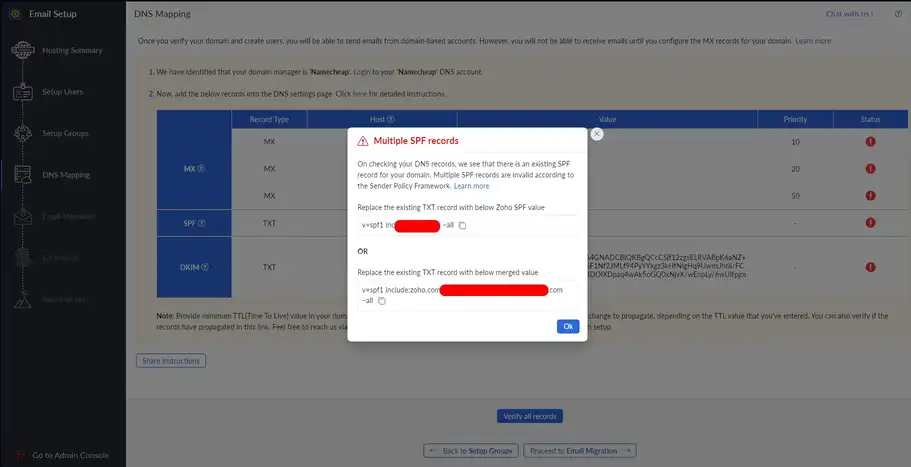
Then you also go into the domain configuration manager to enter these values. Wait a while for the new configuration to be updated and then click Verify SPF Record to complete the process.

3.2.4.3. Configure DKIM
The steps to configure DKIM are similar to those performed with MX and SPF Record. Copy the information below, save the configuration in the manager and click Verify DKIM Record to complete the process.
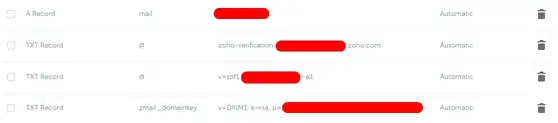
After you configure MX Record. Once SPF and DKIM are complete, you can click Verify all records to have Zoho authenticate all at once. If the Status column turns green, it proves that you have configured correctly and successfully.

Zoho will then propose solutions for Email Migration and Data Migration. These are advanced features. If you do not need them, just click Proceed to skip.

Click Proceed to Email Migration to skip this step

Click Proceed to Go Mobile to skip this step

Click Proceed to Setup Completion to skip this step
So, you have completed the process of creating and configuring emails by domain name for free on the Zoho Email platform. Click on Check out your inbox to check the activity of your email domain on Zoho Mail.

An instruction pop-up will appear, if you have free time, check it out, otherwise just skip.
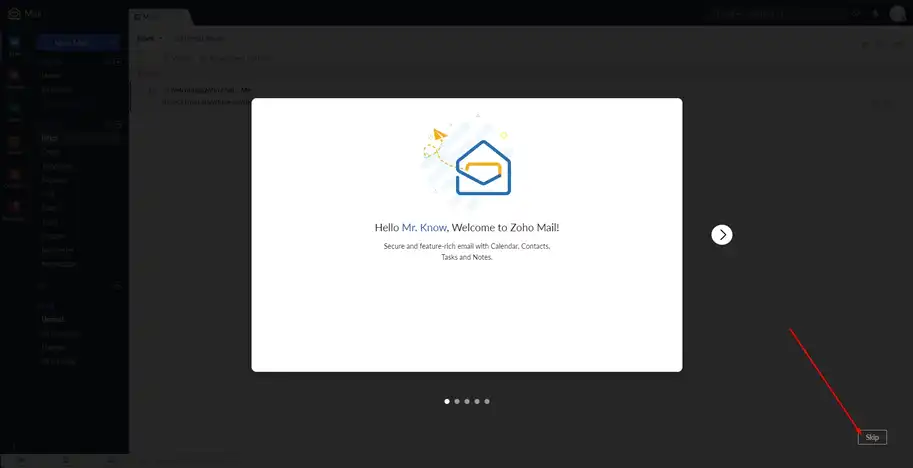
If you don’t wanna see the instructions, just click skip

So your email domain is already active, and you can use it to check mail as usual.
3.2.5. How to add email accounts in Zoho Mail
After configuration is complete, Zoho Mail will transfer you to the main management interface Admin Console. Now you can perform the tasks of viewing, editing, deleting, and managing this email system.
To create a new email account, select User in the Menu bar on the left side of the screen > Select Add to add a new account.
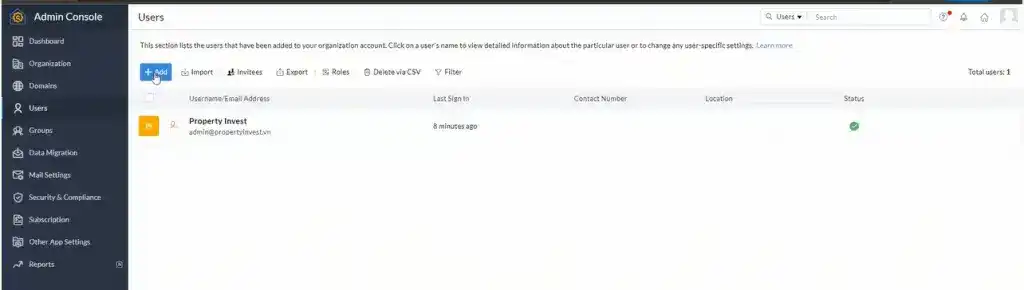
An information panel will appear, and you can fill in the full name, username, and password fields as required. Then select Add to complete this process.
Thank you for reading my sharing, hopefully it has brought more or less useful value to you.
- Sky -